Kubernetes Explained- Part 2

I'm an automation enthusiast who loves building projects and sharing my experiences through part-time blogging. With a passion for DevOps and open-source tech, I'm always seeking new ways to contribute to the community. I'm also a machine learning enthusiast who enjoys expanding my knowledge in the field. Above all, I believe in learning in public and creating an environment that encourages growth and development.
Kubernetes can be tricky to learn, but once we get hold of it, we won't forget it. So having learnt the basics in part 1, let's get into the working of it.
Working
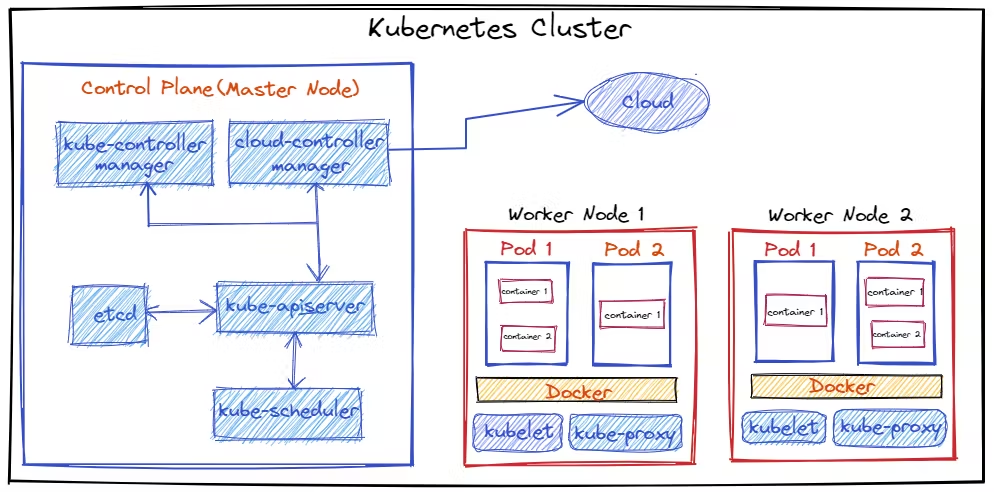
As mentioned earlier, Kubernetes is about taking a bunch of VMs and transforming them into a unified API surface that developers can interact with using containers – to orchestrate their applications without thinking of machines that lie below.
 Let’s say we are building a web app. Made using container images (see here). These images run on pods. We therefore need a deployment file listing the details of the app, the number of replicas and other related things.
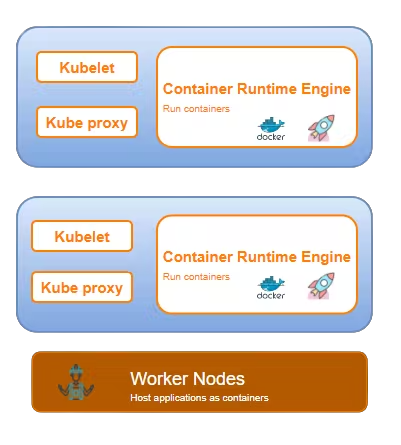
Kubectl communicates with the API server and in turn, the API server does the necessary steps to allocate the required resources from our VMs. The required number of pods are created. The scheduler allocates the resources from the VM.
Now, to allow the web app to be accessed by users, we expose a port and use services which act like a load balancer, redirecting traffic according to the requirement.
And that’s how a very basic web app is deployed and managed using Kubernetes.
To try out Kubernetes, you’ll need to download the additional tools listed here:
- Docker: Docker is a set of platform-as-a-service products that use OS-level virtualization to deliver software in packages called containers. You can read more about it here.
- Kubectl: The Kubernetes command-line tool, kubectl, allows you to run commands against Kubernetes clusters. You can use kubectl to deploy applications, inspect and manage cluster resources, and view logs.
- Minikube: minikube is a tool that lets you run Kubernetes locally. minikube runs a single-node Kubernetes cluster on your personal computer (including Windows, macOS and Linux PCs) so that you can try out Kubernetes, or for daily development work.
But before you embark on your Kubernetes journey, it’s useful to familiarize yourself with the following terms:
DaemonSet
A DaemonSet ensures that all (or some) nodes run a copy of a pod. As nodes are added to the cluster, pods are added to the DaemonSet. As nodes are removed from the cluster, these pods are garbage-collected. Deleting a DaemonSet will clean up the pods it created.
Stateful
‘Stateful’ applications save data to persistent disk storage for use by the server, clients, and other applications. A database or key-value store, where data is stored to and retrieved from by other applications, is an example of a stateful application.
StatefulSet
StatefulSet is the workload API object used to manage stateful applications. It manages the deployment and scaling of a set of pods, and provides guarantees about the ordering and uniqueness of these pods.
Job and CronJob
Jobs and CronJobs define tasks that will run to completion and then stop. Jobs represent one-off tasks, whereas CronJobs recur according to a schedule.
Workload
A workload is an application running on Kubernetes. Whether your workload is a single component or several that work together, on Kubernetes you run it inside a set of pods. In Kubernetes, a pod represents a set of running containers on your cluster.
Let’s look at some basic commands
- If you want to list all pods in the namespace
kubectl get pods
//The same thing can be used for services, nodes and others just swap pods for whichever one you want
- If you show details of a specific resource or group of resources, say a pod named my-pod.
kubectl describe pods my-pod - Let’s say you want to delete this my-pod
kubectl delete pod my-pod - To check on resource utilization
kubectl top node
//Once again you can replace node with pod
To learn about Kubernetes with a demo, one of the best documentations to refer to is the official one.
If you want even more in-depth knowledge check out this article.
So that brings an end to this blog on Kubernetes basics. Hope you liked it. Stay Tuned for more blogs and don't forget to provide your feedback in the response section.
Thank you. Happy learning!
Edited by @MartinJames_111


